bowtie2 tip for relaxing the parameters of alignment. It’s no big secret that bowtie2 has these options, and there’s some pretty good guidance in the manual, too. However, we’ve had significant trouble in our lab finding a suitable set of permissive alignment parameters.
In the course of my PhD work on haplotyping regions of metagenomes, I have found that even using bowtie2‘s somewhat permissive --very-sensitive-local, that sequences with an identity to the reference of less than 90% are significantly less likely to align back to that reference. This is problematic in my line of work, where I wish to recover all of the individual variants of a gene, as the basis of my approach relies on a set of short reads (50-250bp) aligned to a position on a metagenomic assembly (that I term the pseudo-reference). It’s important to note that I am not interested in the assembly of individual genomes from metagenomic reads, but the genes themselves.
Recently, the opportunity arose to provide some evidence to this. I have some datasets which constitute “synthetic metahaplomes” that consist of a handful of arbitrary known genes that all perform the same function, each from a different organism. These genes can be broken up into synthetic reads and aligned to some common reference (another gene in the same family).
This alignment can be used a means to test my metagenomic haplotyper; Gretel (and her novel brother data structure, Hansel), by attempting to recover the original input sequences, from these synthetic reads. I’ve already reported in my pre-print that our method is at the mercy of the preceding alignment, and used this as the hypothesis for a poor recovery in one of our data sets.
Indeed as part of my latest experiments, I have generated some coverage heat maps, showing the average coverage of each haplotype (Y-axis) at each position of the pseudo-reference (X-axis) and I’ve found that for sequences beyond the vicinity of 90% sequence identity, --very-sensitive-local becomes unsuitable.
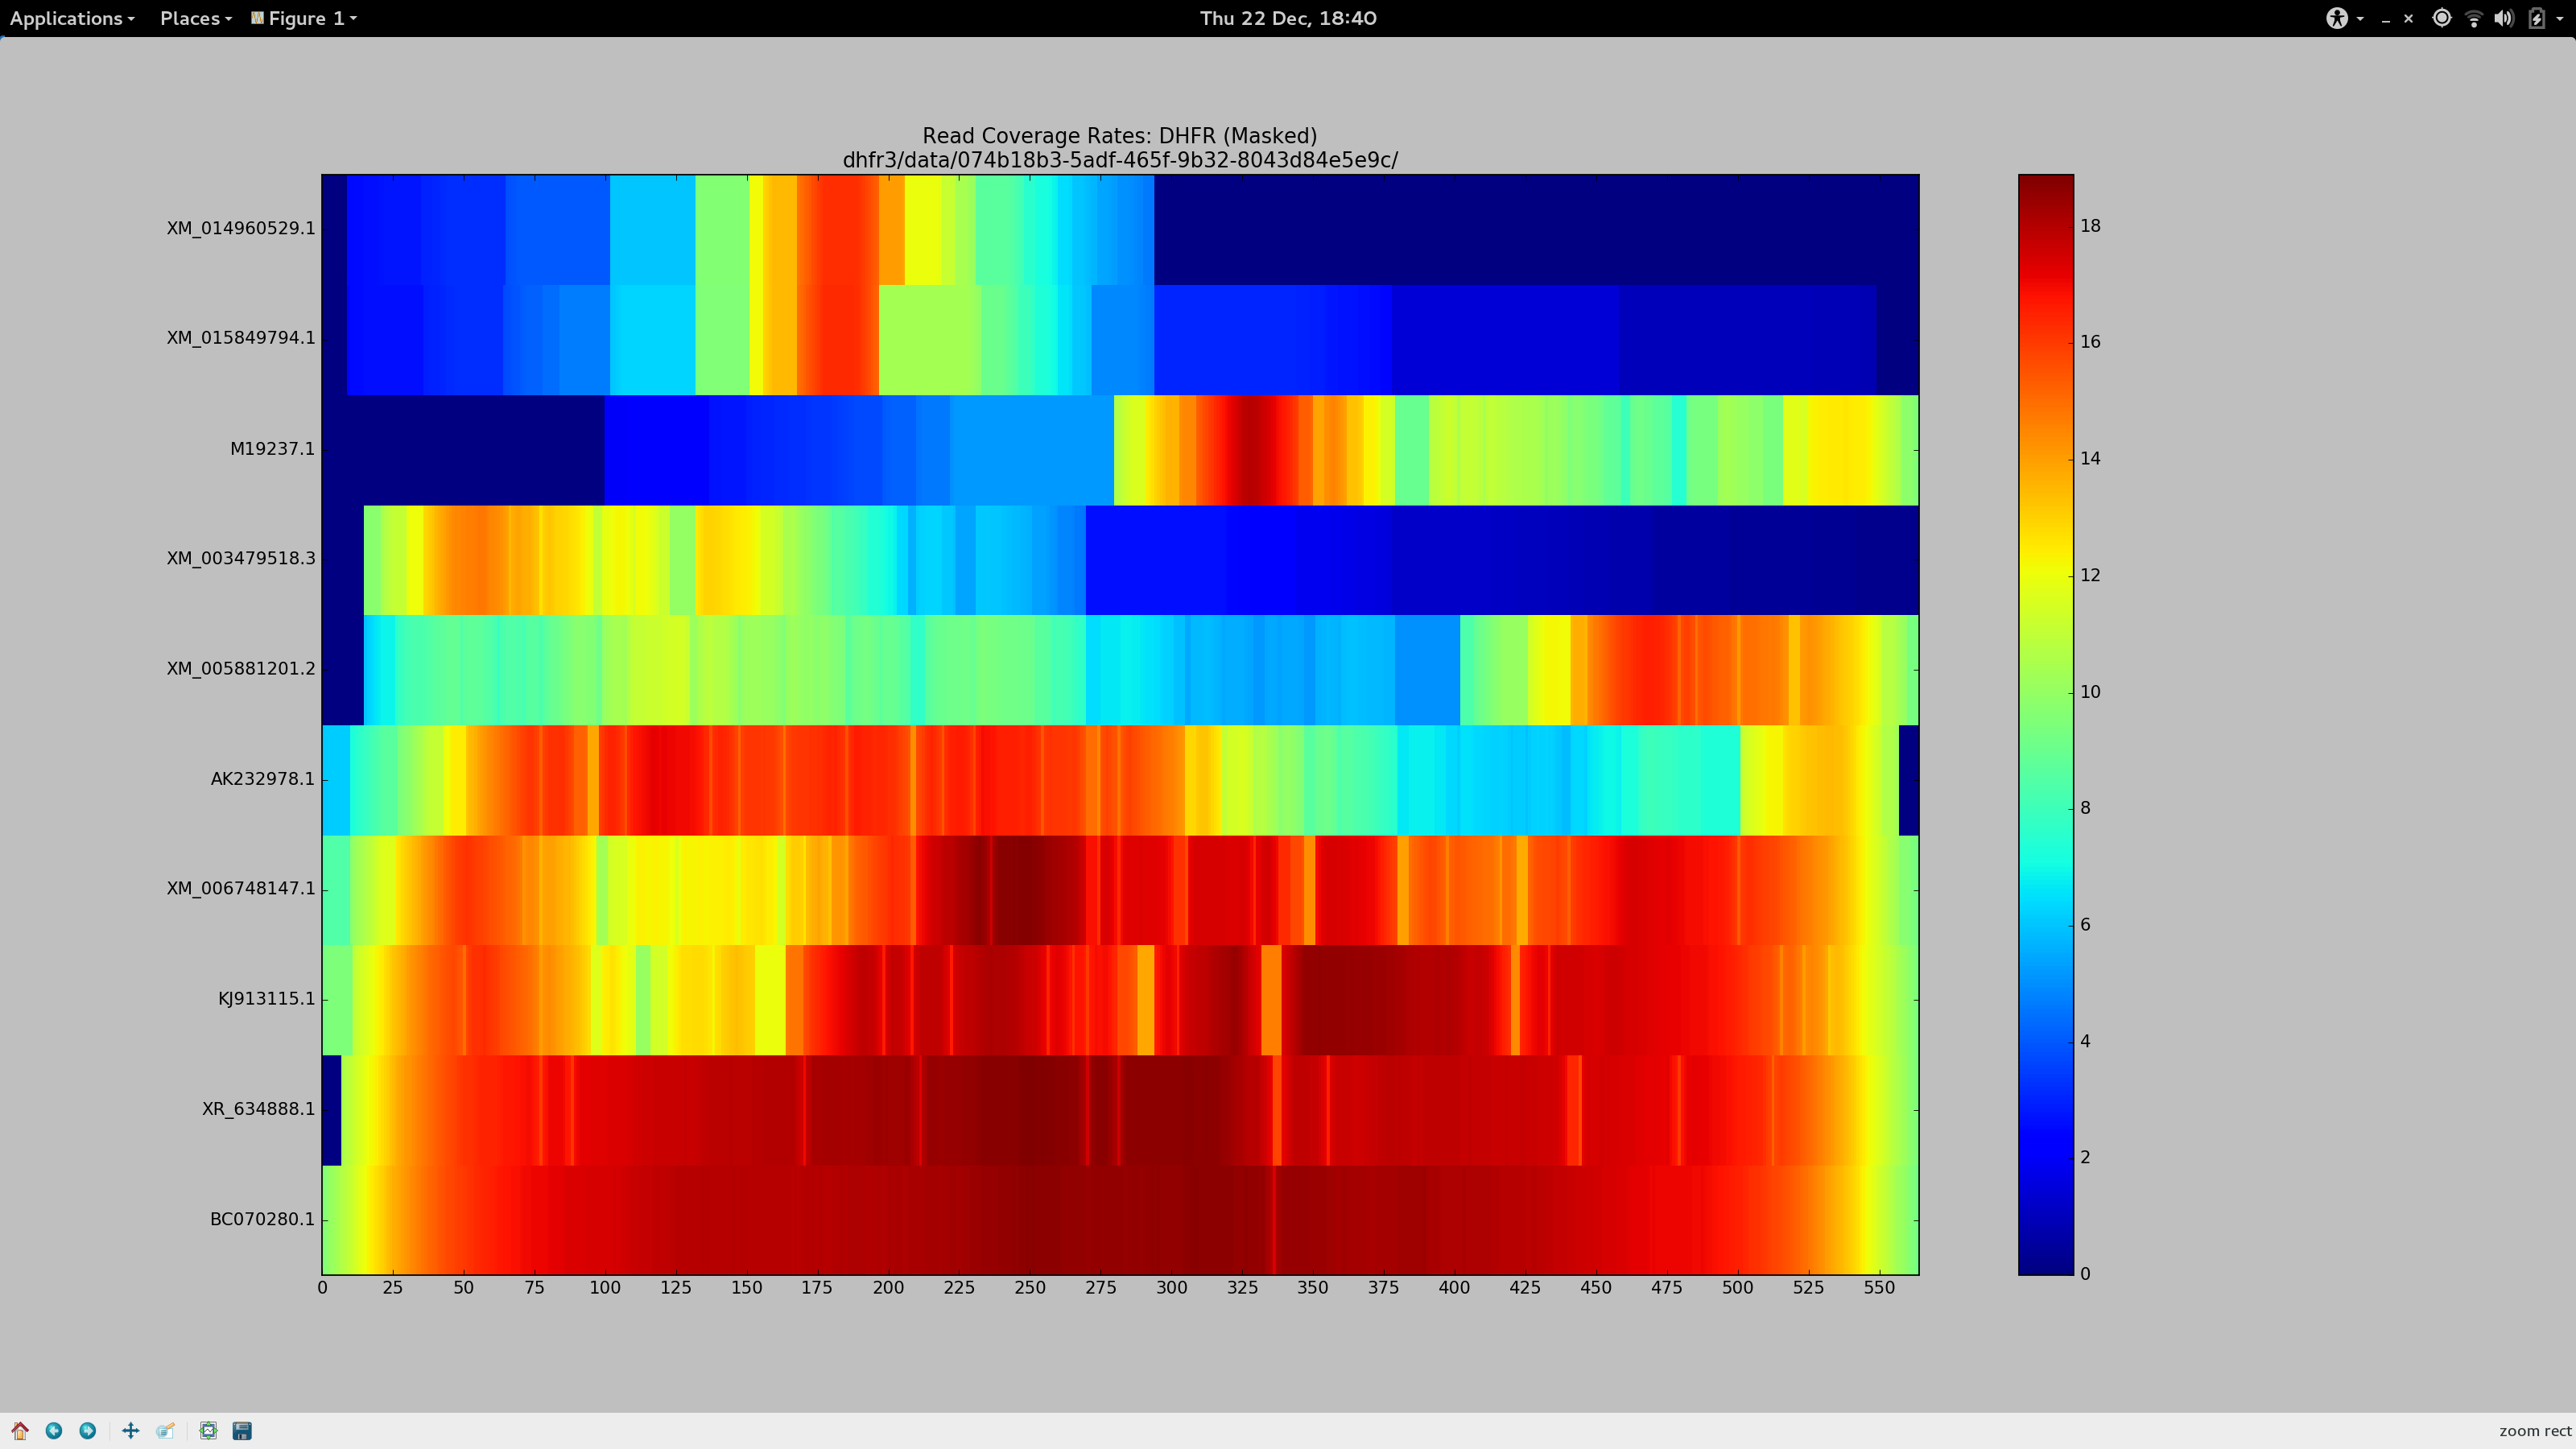
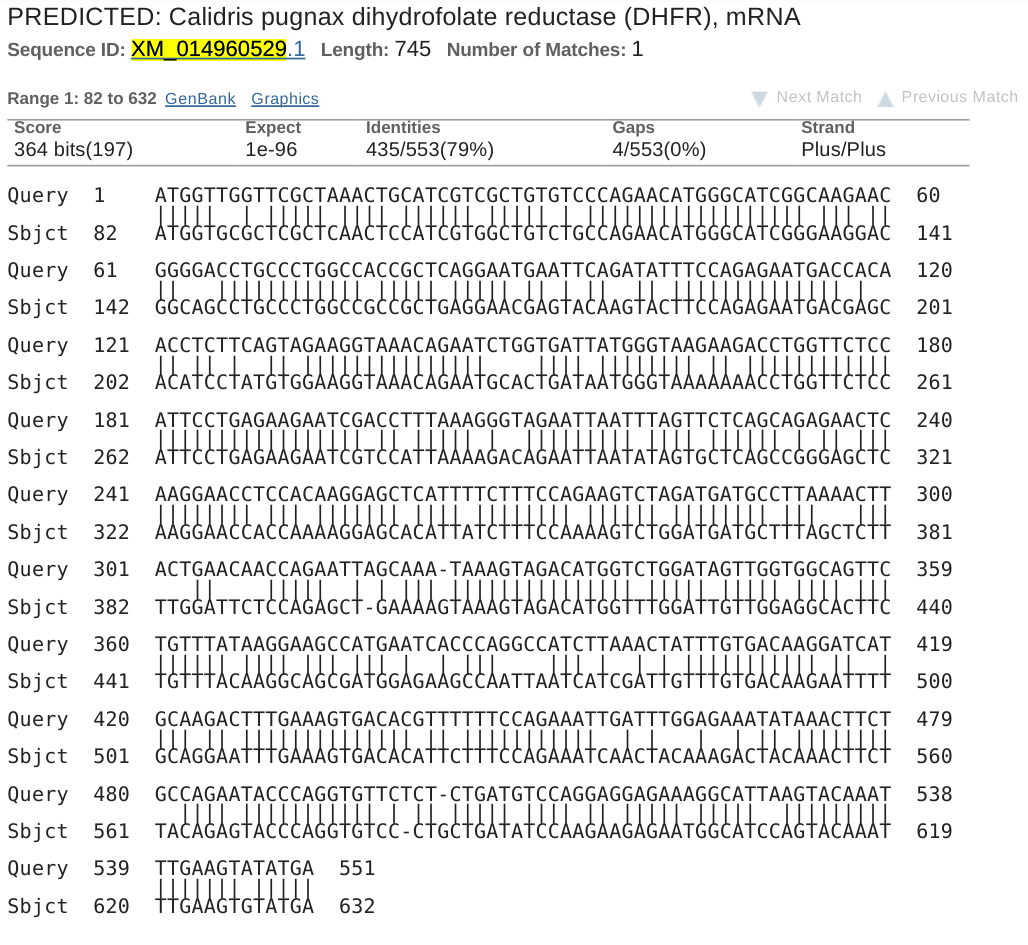
The BLAST record below represents the alignment that corresponds to the gene whose reads go on to align at the average coverage depicted at the top bar of the above heatmap. Despite its 79% identity, it looks good(TM) to me, and I need sequence of this level of diversity to align to my pseudo-reference so it can be included in Gretel‘s analysis. I need generous alignment parameters to permit even quite diverse reads (but hopefully not too diverse such that it is no longer a gene of the same family) to map back to my reference. Otherwise Gretel will simply miss these haplotypes.
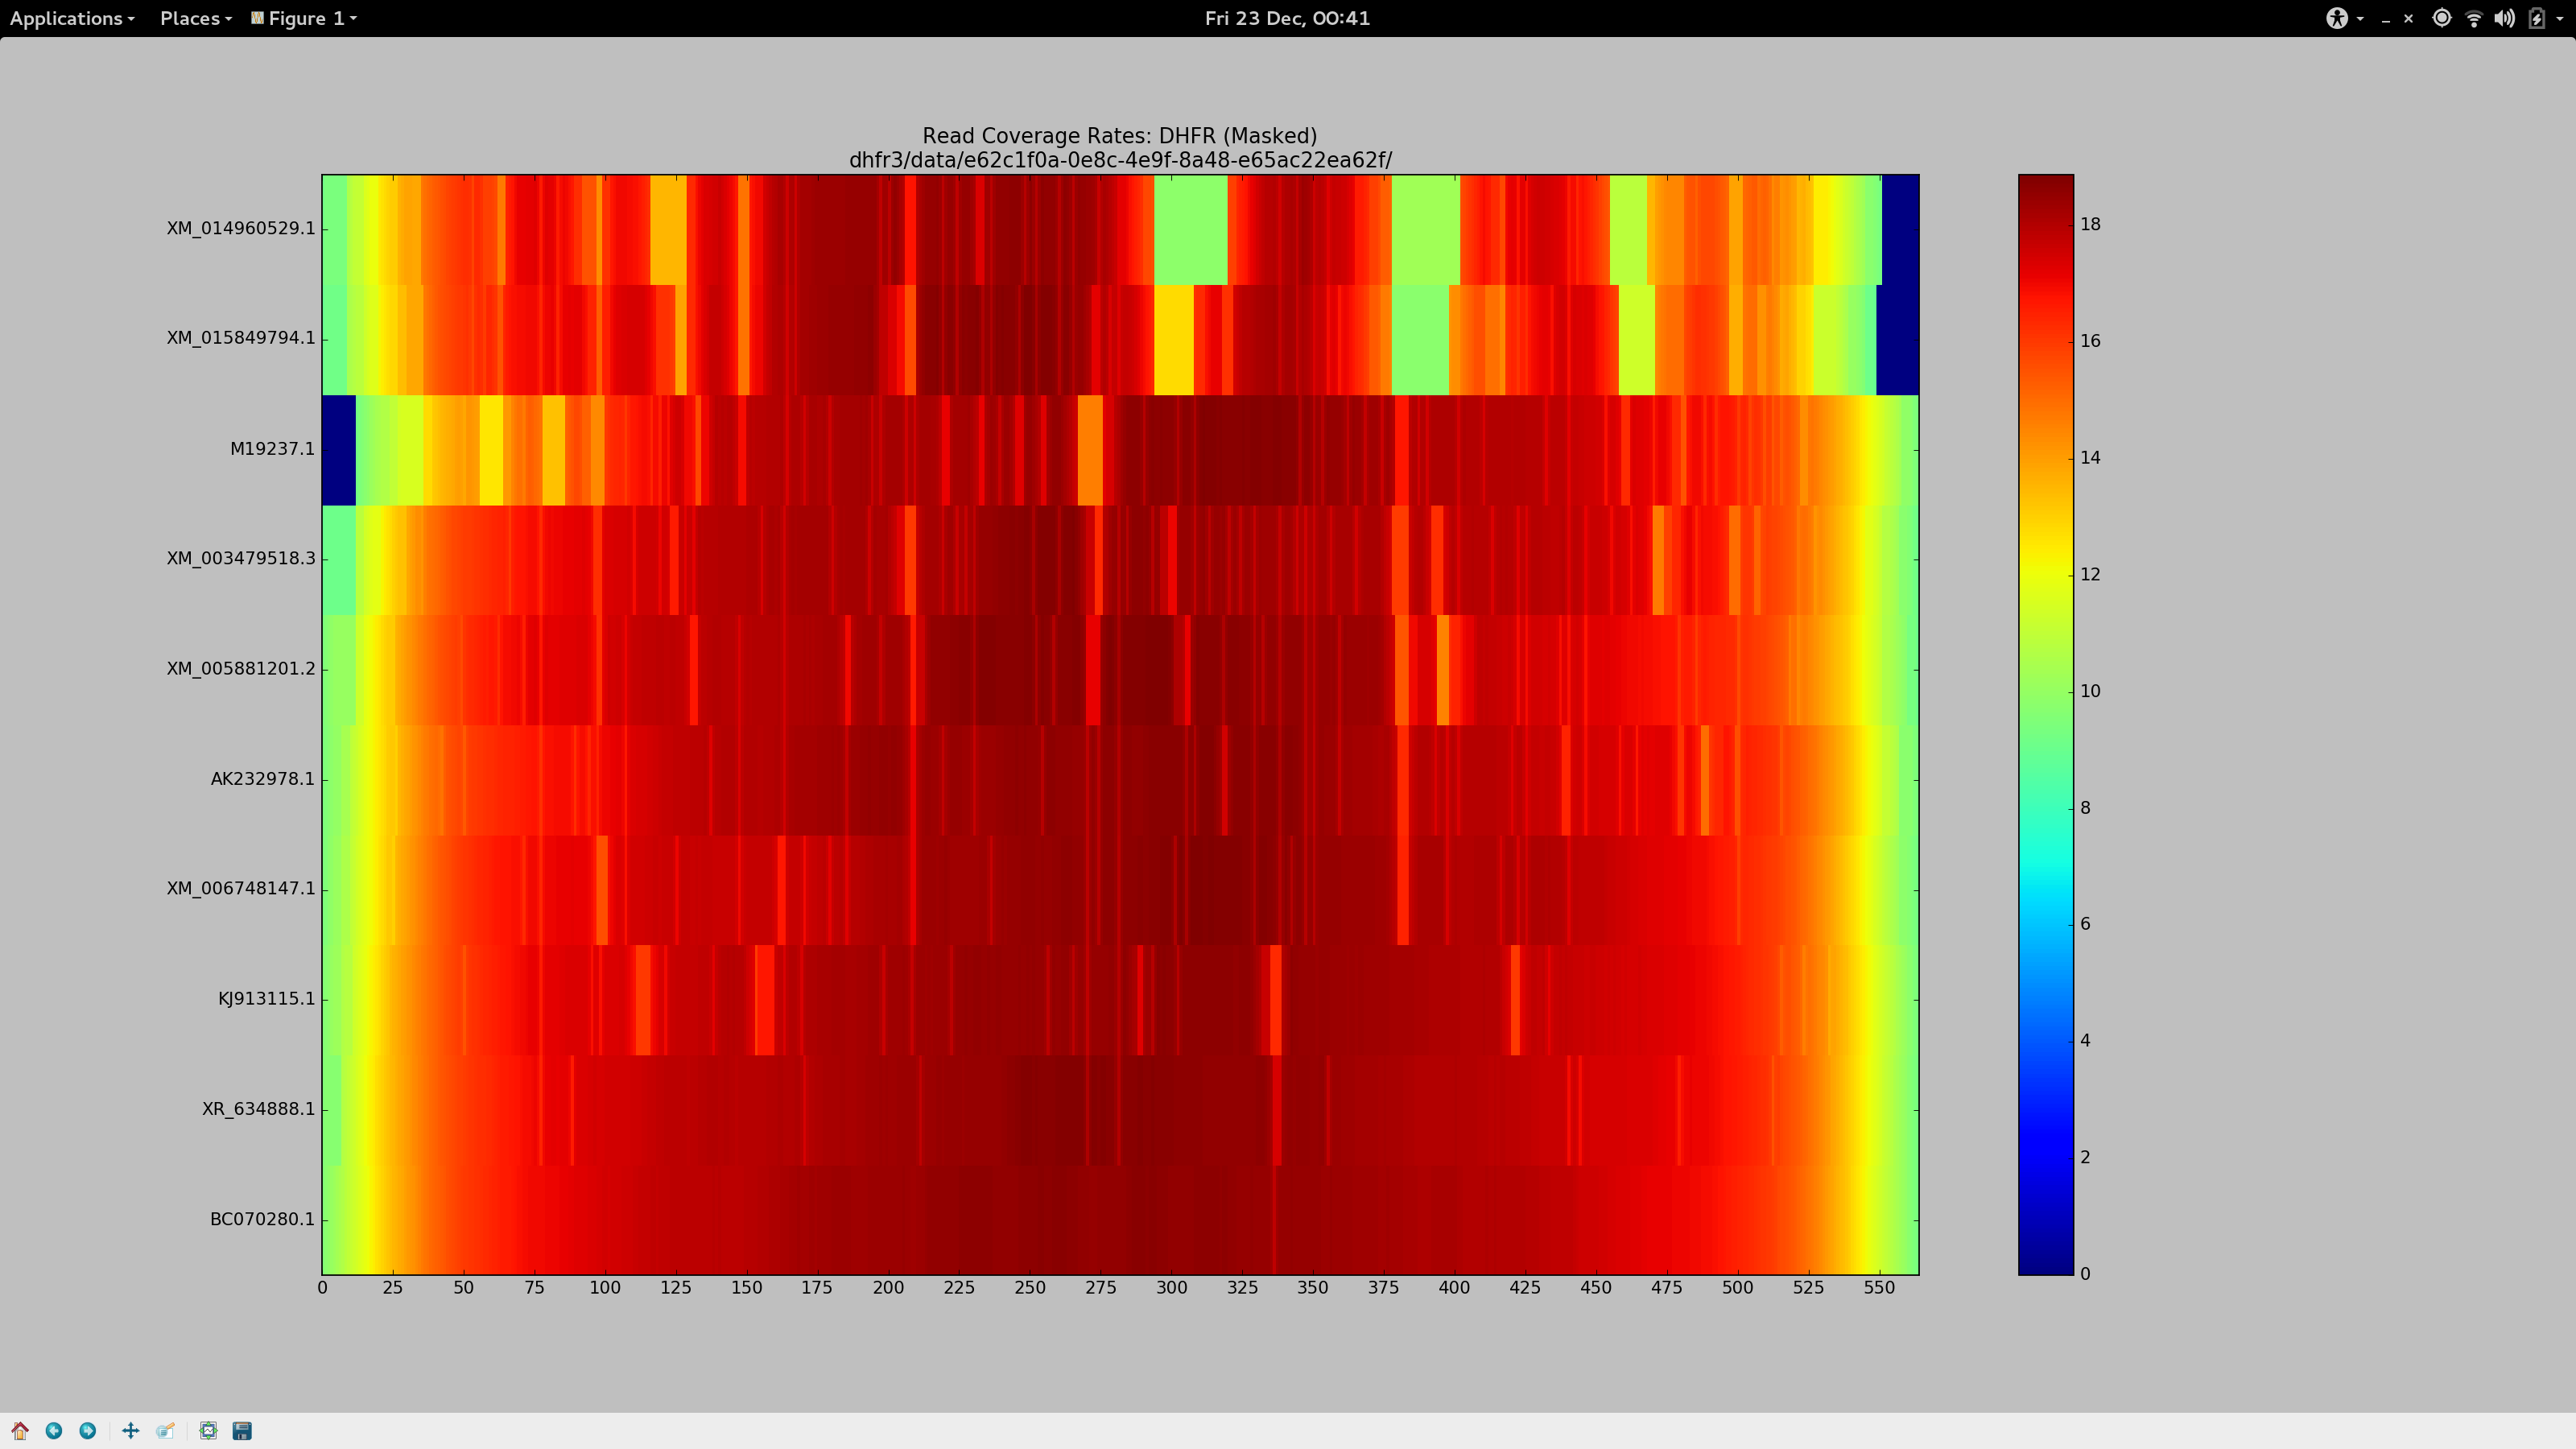
So despite having already spent many days of my PhD repeatedly failing to increase my overall alignment rates for my metagenomes, I felt this time it would be different. I had a method (my heatmap) to see how my alignment parameters affected the alignment rates of reads on a per-haplotype basis. It’s also taken until now for me to quantify just what sort of sequences we are missing out on, courtesy of dropped reads.
I was determined to get this right.
Playing fucking mastermind with bowtie2 parameters pic.twitter.com/yDHduJPBNM
— Sam Nicholls (@samstudio8) December 23, 2016
For a change, I’ll save you the anticipation and tell you what I settled on after about 36 hours of getting cross.
--local -D 20 -R 3
Ensure we’re not performing end-to-end alignment (allow for soft clipping and the like), and borrow the most sensitive default “effort” parameters.-L 3
The seed substring length. Decreasing this from the default (20 - 25) to just3allows for a much more aggressive alignment, but adds computational cost. I actually had reasonably good results with-L 11, which might suit you if you have a much larger data set but still need to relax the aligner.-N 1
Permit a mismatch in the seed, because why not?--gbar 1
Has a small, but noticeable effect. Appears to thin the width of some of the coverage gap in the heatmap at the most stubborn sites.--mp 4
Reduces the maximum penalty that can be applied to a strongly supported (high quality) mismatch by a third (from the default value of6). The aggregate sum of these penalties are responsible for the dropping of reads. Along with the substring length, this had a significant influence on increasing my alignment rates. If your coverage stains are stubborn, you could decrease this again.
Tada.
tl;dr
bowtie2 --local -D 20 -R 3 -L 3 -N 1 -p 8 --gbar 1 --mp 3
jesus christ my repos are just full of garbage commits to get sphinx and travis to work
— Sam Nicholls (@samstudio8) June 14, 2016
So for my future sanity and possibly yours, here’s a quick guide1 (and some links to resources) on how to do the things that I don’t do often enough to remember first hand.
To begin…
Install Sphinx2:
pip install Sphinx
From the root of your project, initialise the docs/ directory with sphinx-quickstart:
mkdir docs
cd docs/
sphinx-quickstart
sphinx-quickstart rapidly fires a series of prompts, the defaults are typically sensible, but enable autodoc when prompted. intersphinx might be useful if you have projects whose documentation may cross-reference eachother. viewcode adds links to source code from module listings, which could be helpful to end users. Make good use of the provided Makefile.
doc/ is also an acceptable directory name, by default, ReadTheDocs looks for either, before rummaging around your whole repository looking for something that appears to be documentation.
Generate module API docs
Assuming you enabled the autodoc extension, Sphinx can be set-up to automatically build a nice module index (such as the one found on the Goldilocks documentation) with links to documentation generated from the docstrings of your modules and classes; which is both pretty and a nice excuse to document your code properly too.
However this feature doesn’t work out of the box as you must first kickstart the API documentation with sphinx-apidoc:
cd docs/
sphinx-apidoc -o source/ ../<package>
Be sure to set the -o outputdir that will contain the generated Sphinx source files to source/. This took me a while to figure out, but without it (say just dumping everything into the docs/ directory), the py-modindex.html file would not be generated when built by ReadTheDocs and would thus be missing, causing a 404 on the website3. sourcedir (which is more sensibly called module_path in the Sphinx documentation) should point to your Python package (e.g. ../<package>)4.
Continue reading to find out why this still won’t work yet.
Configuration
Sphinx is configured by a conf.py that sits in the docs/ directory. The majority of important configuration options have already been set for you by sphinx-quickstart but here are a couple of things that I typically alter:
Theme
At the time of writing, the default theme is alabaster, rocked by various projects including the glorious requests package. However I actually like the ReadTheDocs default theme (other themes are available) and alter the html_theme accordingly:
html_theme = 'sphinx_rtd_theme'
Make autodoc actually work
sphinx-apidoc merely generates “stubs” for each of your modules. The stubs contain automodule directives which in turn inform sphinx-build to invoke autodoc to do the heavy lifting of actually generating the API documentation from the docstrings of a particular module. I’ve found that out of the box, I just get a screenful of ImportError‘s from autodoc during sphinx-build:
WARNING: autodoc: failed to import module
To ensure that sphinx-build can import your package and generate some lovely API documentation (and that all important module index; py-modindex), simply uncomment this line near the top of conf.py and those warnings should disappear on your next attempt at make html:
# If extensions (or modules to document with autodoc) are in another directory,
# add these directories to sys.path here. If the directory is relative to the
# documentation root, use os.path.abspath to make it absolute, like shown here.
sys.path.insert(0, os.path.abspath('.'))
For some reason however, this fix doesn’t work in my latest project, so I added the following line beneath for good measure and all was well:
sys.path.insert(0, os.path.abspath('../'))
numpy style documentation with Napoleon
I find reStructuredText kinda grim for docstrings, so I use the sphinx-napoleon extension. This allows you to write numpy or Google style docstrings instead of dense blocks of quite difficult to read RST. As of Sphinx 1.3, the extension no longer needs to be manually installed and can be enabled in the same way as other extensions, like the autodoc:
extensions = [
    ...
    'sphinx.ext.napoleon',
]

napoleon_google_docstring = False
napoleon_use_param = False
napoleon_use_ivar = True
Simply append sphinx.ext.napoleon to the extensions list. Underneath, I’ve added a few configuration options that disable parsing of Google-style docstrings and alter how parameters and return types for functions are formatted in the generated documentation to taste. You can read about the napoleon configuration options on the official documentation and decide for yourself which options you may want to override.
As evident, I personally favour the numpy docstring style, which has a nice and simple guide that I keep misplacing.
Include your README and CHANGELOG
My repository already has a README.rst and CHANGELOG.rst, which can quickly be added to our Sphinx documentation without duplication. First, add we’ll add them to the table of contents in index.rst:
[...]
.. toctree::
   :maxdepth: 2

   readme
   changelog
[...]
Now, we’ll add directives to new readme.rst and changelog.rst files to include the contents from the files in the root of the repository to save duplication. For example:
.. include:: ../README.rst
Simple!
Enable develop branch doc on ReadTheDocs
Assuming you’ve actually set up ReadTheDocs (a very simple point-and-click adventure involving a short form, 2FA with Github and “importing” a project), familiarise yourself with your RTD dashboard. Of immediate use is the Versions tab of a relevant project, from here you can enable documentation to be generated for the various branches of your project. Personally I like to have documentation available for the develop branch, for those who just can’t wait for things to be less broken in master.
Other general Sphinx tips
Talking about classes and methods
Sphinx has a really nifty feature where one can reference classes, functions and the like anywhere in your documentation (even docstrings, too), and it will generate a link to the relevant part of the documentation. However I always forget the syntax, and what this feature is called. Turns out, this is referencing domains in Sphinx terminology and the syntax for each domain is well documented on this page that I just have to keep finding.
Custom CSS
One disagreement I have with the Sphinx RTD theme is how tables appear on smaller screens. Thankfully, it’s quite simple to add overrides to deal with minor design bothers like these. Just define a setup function in your conf.py that adds your stylesheet:
...
def setup(app):
    app.add_stylesheet('theme_overrides.css')
...
I’m not sure if it particularly matters where this setup appears, but for the record, mine precedes the “Options for LaTeX output” comment line. Stylesheets and other “static” content are unsurprisingly expected to appear in the _static directory. If you don’t have a docs/_static directory, now would be a good time to create one and add it to version control. For the sake of completeness, or in case you also dislike the behaviour of tables under the default RTD theme, here is my theme_overrides.css:
/* override table width restrictions as found on https://github.com/getpelican/pelican/issues/1311 */
.wy-table-responsive table td, .wy-table-responsive table th {
    /* !important prevents the common CSS stylesheets from
       overriding this as on RTD they are loaded after this stylesheet */
    white-space: normal !important;
}

.wy-table-responsive {
    overflow: visible !important;
}
Custom requirements
Before Sphinx 1.3, one had to install the sphinx-napoleon extension separately. Although this is no longer the case, you might find yourself wondering how to get custom plugins and the like to work with your ReadTheDocs documentation instance in future:
- Add the name of the extension5 to the
extensionslist in yourconf.pyas we have done previously. - Create a newline delimited list of package names to be installed from
pipindocs/requirements.txt - Navigate to the Advanced Settings of your ReadTheDocs project, and tick the
Install your project inside a virtualenvoption. Specifydocs/requirements.txtin the text box underneath. - Future builds are now automatically built inside a
virtualenvand the necessary requirements are fetched withpip.
tl;dr
sphinx-quickstartto, er, quickstartsphinx-apidocto generate API documentation stubs- Ensure API doc lives in
docs/source/to avoid ReadTheDocs’ Sphinx builder not generating (missing)py-modindex - Set
html_themetodefaultinconf.pyfor “standard” ReadTheDocs theme - Uncomment system path line in
conf.py(may also need to add../) to avoid Sphinx not finding your package and throwing import errors instead - Check out the advanced settings (versions) on ReadTheDocs
- Read the numpy docstring styleguide, and about referencing Sphinx domains
- Add a
setupfunction toconf.pyto define additional (overriding) stylesheets - Add a
docs/requirements.txt, update yourconf.pyand tick thevirtualenvoption on ReadTheDocs Advanced Settings for your project to enable third party plugins viapip.
- Alternatively, you could read the actual tutorial, which I of course, did not. ↩
- Not to be confused with S.P.H.I.N.X. (Sphinx!) ↩
-
I don’t know the cause of this, or whether I have just confounded the solution, but although my local
py-modindex.htmlwas generated just fine without thesource/directory, the ReadTheDocs version still threw a 404. Invokingsphinx-apidocto write todocs/source/instead (and committing those files) seemed to make the module index appear on RTD.Shrug.6 ↩ - Thanks Tim! ↩
-
This is in bold, as the extension name is not necessarily exactly the same as the
pippackage name. Napoleon for example was,sphinxcontrib.napoleonandsphinxcontrib-napoleon, respectively. ↩ -
Update I’m told that this could be because I said yes to the first option of
sphinx-quickstarton whether to separatesourceandbuild, meaning I need to use thesourcedirectory forapidoc.[^5] ↩
If you just want to know what happened without the flair, skip to the timeline.
Earlier this afternoon, my server was upset. At 15:57, a duo of IP addresses begun making rapid and repeated POST requests to an auxiliary component of WordPress, forcing apache to begin consuming significant amounts of system memory. Disappointingly this went undetected, and less than half an hour later, at 16:24, the system ran out of memory, invoked the OOM killer and terminated mysqld. Thus at 16:24, denial of service to all applications requiring access to a database was successful.
Although the server dutifully restarted mysqld less than a minute later, the attack continued. Access to apache was denied intermittently (by virtue of the number of requests) and the OOM killer terminated mysqld again at 16:35. The database server daemon was respawned once more, only to be killed just short of half an hour later at 17:03.
It wasn’t until 17:13 that I was notified of an issue, by means of a Linode anomaly notification, disk I/O had been unusually high for a two hour period. I was away from my terminal but used my phone to check my netdata instance. Indeed I could confirm a spike in disk activity but it appeared to have subsided. I had run some scripts and updates (which can occasionally trigger these notifications) in the previous two hours so assumed causation and dismissed the notification. Retrospectively, it would be a good idea to have some sort of check list to run through upon receipt of such a message, even if the cause seems obvious.
The attack continued for the next hour and a half, maintaining denial of the mysqld service (despite the respawner’s best effort), at 18:35 (two and a half hours after the attack began) I returned from the field to my terminal and decided to double check the origin of the high disk I/O. I loaded the netdata visualiser (apache seemed to be responsive) and load seemed a little higher than usual. Disk I/O was actually higher than usual, too. It would seem that I had become a victim of y-axis scaling; the spike I had dismissed as a one-off burst in activity earlier had masked the increase in average disk I/O. Something was happening.
I checked system memory, we were bursting at the seams. The apache process was battling to consume as much memory on the system as possible. mysqld appeared to be in a state of flux, so I tried to reach database backed applications; Phabricator, and my blog – both returned some form of upset “where is my database” response. I opened the syslog and searched for evidence that the out of memory killer had been swinging its hammer. At this point I realised this was a denial of service.
I located the source of the high disk I/O when I opened the apache access log. My terminal spewed information on POST requests to xmlrpc.php aimed at two WordPress sites hosted on my server. I immediately added iptables rules for both IP addresses, and two different IPs from the same block took over the attack. I checked the whois and discovered all the origin IPs were in the same assigned /24 block, so I updated iptables with a rule to drop traffic from the whole block. The requests stopped and I restarted the seemingly mangled mysqld process.
I suspect the attack was not aimed at us particularly, but rather the result of a scan for WordPress sites (I am leaning towards for the purpose of spamming). However I was disappointed in my opsec-fu, not only did I prevent this from happening, but I failed to stop it happening for over two hours. I was running OSSEC, but any useful notifications failed to arrive in time as I had configured messages to be sent to a non-primary address that GMail must poll from intermittently. A level 12 notification was sent 28 minutes after the attack started as soon as the OOM was invoked for the first time, but the message was not pulled to my inbox until after the attack had been stopped.
The level of traffic was certainly abnormal and I was also frustrated that I had not considered configuring fail2ban or iptables to try and catch these sort of extreme cases. Admittedly, I had dabbled in this previously, but struggled to strike a balance with iptables that did not accidentally ban false positives attempting to use a client’s web application. Wanting to combat this happening in future, I set about to implement some mitigations:
Mitigation Implementation
Configure a crude fail2ban jail for apache DOS defence
My first instinct was to prevent ridiculous numbers of requests to apache from the same IP being permitted in future. Naturally I wanted to tie this into fail2ban, the daemon I use to block access to ssh, the mail servers, WordPress administration, and such. I found a widely distributed jail configuration for this purpose online but it did not work; it didn’t find any hosts to block. The hint is in the following error from fail2ban.log when reloading the service:
fail2ban.jail   : INFO   Creating new jail 'http-get-dos'
...
fail2ban.filter : ERROR  No 'host' group in '^ -.*GET'
The regular expression provided by the filter (failregex) didn’t have a ‘host’ group to collect the source IP with, so although fail2ban was capable of processing the apache access.log for lines containing GET requests, all the events were discarded. This is somewhat unfortunate considering the prevalence of the script (perhaps it was not intended for the combined_vhost formatted log, I don’t know). I cheated and added a CustomLog to my apache configuration to make parsing simple whilst also avoiding interference with the LogFormat of the prime access.log (whose format is probably expected to be the default by other tooling):
LogFormat "%t [%v:%p] [client %h] \"%r\" %>s %b \"%{User-Agent}i\"" custom_vhost
CustomLog ${APACHE_LOG_DIR}/custom_access.log custom_vhost
The LogFormat for the CustomLog above encapsulates the source IP in the same manner as the default apache error.log, with square brackets and the word “client”. I updated my http-get-dos.conf file to provide a host group to capture IPs as below (I’ve provided the relevant lines from jail.local for completeness):
I tested the configuration with fail2ban-regex to confirm that IP addresses were now successfully captured:
$ fail2ban-regex /var/log/apache2/custom_access.log /etc/fail2ban/filter.d/http-get-dos.conf
[...]
Failregex
|- Regular expressions:
|  [1] \[[^]]+\] \[.*\] \[client <HOST>\] "GET .*
|
`- Number of matches:
   [1] 231 match(es)
[...]
It works! However when I restarted fail2ban, I encountered an issue whereby clients were almost instantly banned when making only a handful of requests, which leads me to…
How to badly configure fail2ban
This took some time to track down, but I had the feeling that for some reason my jail.conf was not correctly overriding maxretry – the number of times an event can occur before the jail action is applied, which by default is 3. I confirmed this by checking the fail2ban.log when restarting the service:
fail2ban.jail   : INFO   Creating new jail 'http-get-dos'
...
fail2ban.filter : INFO   Set maxRetry = 3
Turns out, the version of the http-get-conf jail I had copied from the internet into my jail.conf was an invalid configuration. fail2ban relies on the Python ConfigParser which does not support use of the # character for an in-line comment. Thus lines such as the following are ignored (and the default is applied instead):
maxretry = 600 # 600 attempts in
findtime = 30  # 30 seconds (or less)
Removing the offending comments (or switching them to correctly-styled inline comments with ‘;’) fixed the situation immediately. I must admit this had me stumped and seems pretty counter-intuitive especially as fail2ban doesn’t offer a warning or such on startup either. But indeed, it appears in the documentation, so RTFM, kids.
Note that my jail.local above has a jail for http-post-dos, too. The http-post-dos.conf is exactly the same as the GET counterpart, just the word GET is replaced with POST (who’d’ve thought). I’ve kept them separate as it means I can apply different rules (maxretry and findtime) to GET and POST requests. Note too, that even if I had been using http-get-dos today, this wouldn’t have saved me from denial of service, as the requests were POSTs!
Relay access denied when sending OSSEC notifications
As mentioned, OSSEC was capable of sending notifications but they were not delivered until it was far too late. I altered the global ossec.conf to set the email_to field to something more suitable, but when I tested a notification, it was not received. When I checked the ossec.log, I found the following error:
ossec-maild(1223): ERROR: Error Sending email to xxx.xxx.xxx.xxx (smtp server)
I fiddled some more and in my confounding, located some Relay access denied errors from postfix in the mail.log. Various searches told me to update my postfix main.cf with a key that is not used for my version of postfix. This was not particularly helpful advice, but I figured from the ossec-maild error above that OSSEC must be going out to the internet and back to reach my SMTP server and external entities must be authorised correctly to send mail in this way. To fix this, I just updated the smtp_server value in the global OSSEC configuration to localhost:
<ossec_config>
  <global>
    <email_notification>yes</email_notification>
    <email_to>[email protected]</email_to>
    <smtp_server>localhost</smtp_server>
    <email_from>[email protected]</email_from>
  </global>
...
Deny traffic to xmlrpc.php entirely
WordPress provides an auxiliary script, xmlrpc.php which allows external entities to contact your WordPress instance over the XML-RPC protocol. This is typically used for processing pingbacks (a feature of WordPress where one blog can notify another that one of its posts has been mentioned), via the XML-RPC pingback API, but the script also supports a WordPress API that can be used to create new posts and the like. For me, I don’t particularly care about pingback notifications and so can mitigate this attack in future entirely by denying access to the file in question in the apache VirtualHost in question:
<VirtualHost>
...
    <files xmlrpc.php>
        order allow,deny
        deny from all
    </files>
</VirtualHost>
tl;dr
Timeline
1557 (+0'00"): POSTs aimed atxmlrpc.phpfor two WordPressVirtualHostbegin1624 (+0'27"):mysqldterminated by OOM killer1625 (+0'28"):OSSECLevel 12 Notification sent1625 (+0'28"):mysqldrespawns but attack persists1635 (+0'38"):mysqldterminated by OOM killer1636 (+0'39"):mysqldrespawns1700 (+1'03"):OSSECLevel 12 Notification sent1703 (+1'06"):mysqldterminated by OOM killer1713 (+1'16"): Disk IO 2-Hour anomaly notification sent from Linode1713 (+1'16"): Linode notificationX-Receivedand acknowledged by out of office sysop1835 (+2'38"): Sysop login,netdataaccessed1837 (+2'40"):mysqldterminated by OOM killer, error during respawn1839 (+2'42"):iptablesupdated to drop traffic from IPs, attack is halted briefly1840 (+2'43"): Attack continues from new IP,iptablesupdated to drop traffic from block1841 (+2'44"): Attack halted, load returns to normal,mysqldservice restarted1842 (+2'45"): AllOSSECnotificationsX-Receivedafter poll from server
Attacker
POSTrequests originate from IPs in an assigned/24blockwhoisrecord served by LACNIC (Latin America and Caribbean NIC)- Owner company appears to be an “Offshore VPS Provider”
- Owner address and phone number based in Seychelles
- Owner website served via CloudFlare
- GeoIP database places attacker addresses in Chile (or Moscow)
tracerouteshows the connection is located in Amsterdam (10ms away fromvlan3557.bb1.ams2.nl.m24) – this is particularly amusing considering thewhoisowner is an “offshore VPS provider”, though it could easily be tunneled via Amsterdam
Suspected Purpose
- Spam: Attacker potentially attempting to create false pingbacks (to link to their websites) or forge posts on the WordPress blogs in question
- Scan hit-and-run: Scan yielded two
xmlrpc.phpendpoints that could be abused for automatic DOS
Impact
- Intermittent
apachestability for ~3 hours - Full service denial of
mysqlfor ~2.25 hours - Intermittent disruption to email for ~2 hours
Failures
- No monitoring or responsive control configured for high levels of requests to
apache OSSECconfigured to deliver notifications to non-primary address causing messages that would have prompted action much sooner to not arrive within actionable timeframe- Failed to recognise (or consider) disk I/O anomaly message as a red herring for something more serious
- Forgetting that the attack surface for WordPress is always bigger than you think
Positives
- Recently installed
netdatainstance immediately helped narrow the cause down toapachebased activity - Attack mitigated in less than five minutes once I actually got to my desk
Mitigations
OSSECreconfigured to send notifications to an account that does not need to poll from POP3 intermittently- Added simple
GETandPOSTjails tofail2banconfiguration to try and mitigate such attacks automatically in future - Drop traffic to offending WordPress script to reduce attack surface
- Develop a check list to be followed after receipt of an anomaly notification
- Develop a healthy paranoia against people who are out to get you and be inside your computer (or make it fall over)
- Moan about WordPress
Mitigation Tips and Gotcha’s
- Set your
OSSECnotificationsmtp_servertolocalhostto bypassrelay access deniederrors - Make use of
fail2ban-regex <log> <filter>to test your jails - NEVER use
#for inline comments infail2banconfigurations, the entire line is ignored - If you are protecting yourself from
GETattacks, have you forgottenPOST?