Ever since I got my own beehive last summer, I’ve been toying with the idea about cramming it full of interesting sensors to report on the status of my precious hive. During Winter, it is too cold to perform inspections and since my final inspection last October I’ve grown increasingly curious and anxious as to whether the bees had survived. Last week, I finally got a spell of reasonable weather and I’m happy to report that the bees are doing well.
It has been some time since I’d last seen inside the hive. During and following the inspection, I was once again inspired to find a way to monitor their progress. Although primarily due of self-interest as I find the hive fascinating, monitoring a hive poses both some interesting technical problems, and a platform on which to actually quantify their status. Such information could become much more valuable in future when we have more hives, as it would be possible to establish a baseline from which to detect for anomalies early. But again, mostly because beehives are cool.
Proof of Concept Monitor and Transmitter
I’d been discussing these ideas with Tom, who you might remember from the lightstick project as being the half of the newly created Sam and Tom Industrys venture, who is actually capable of making things with electronics.
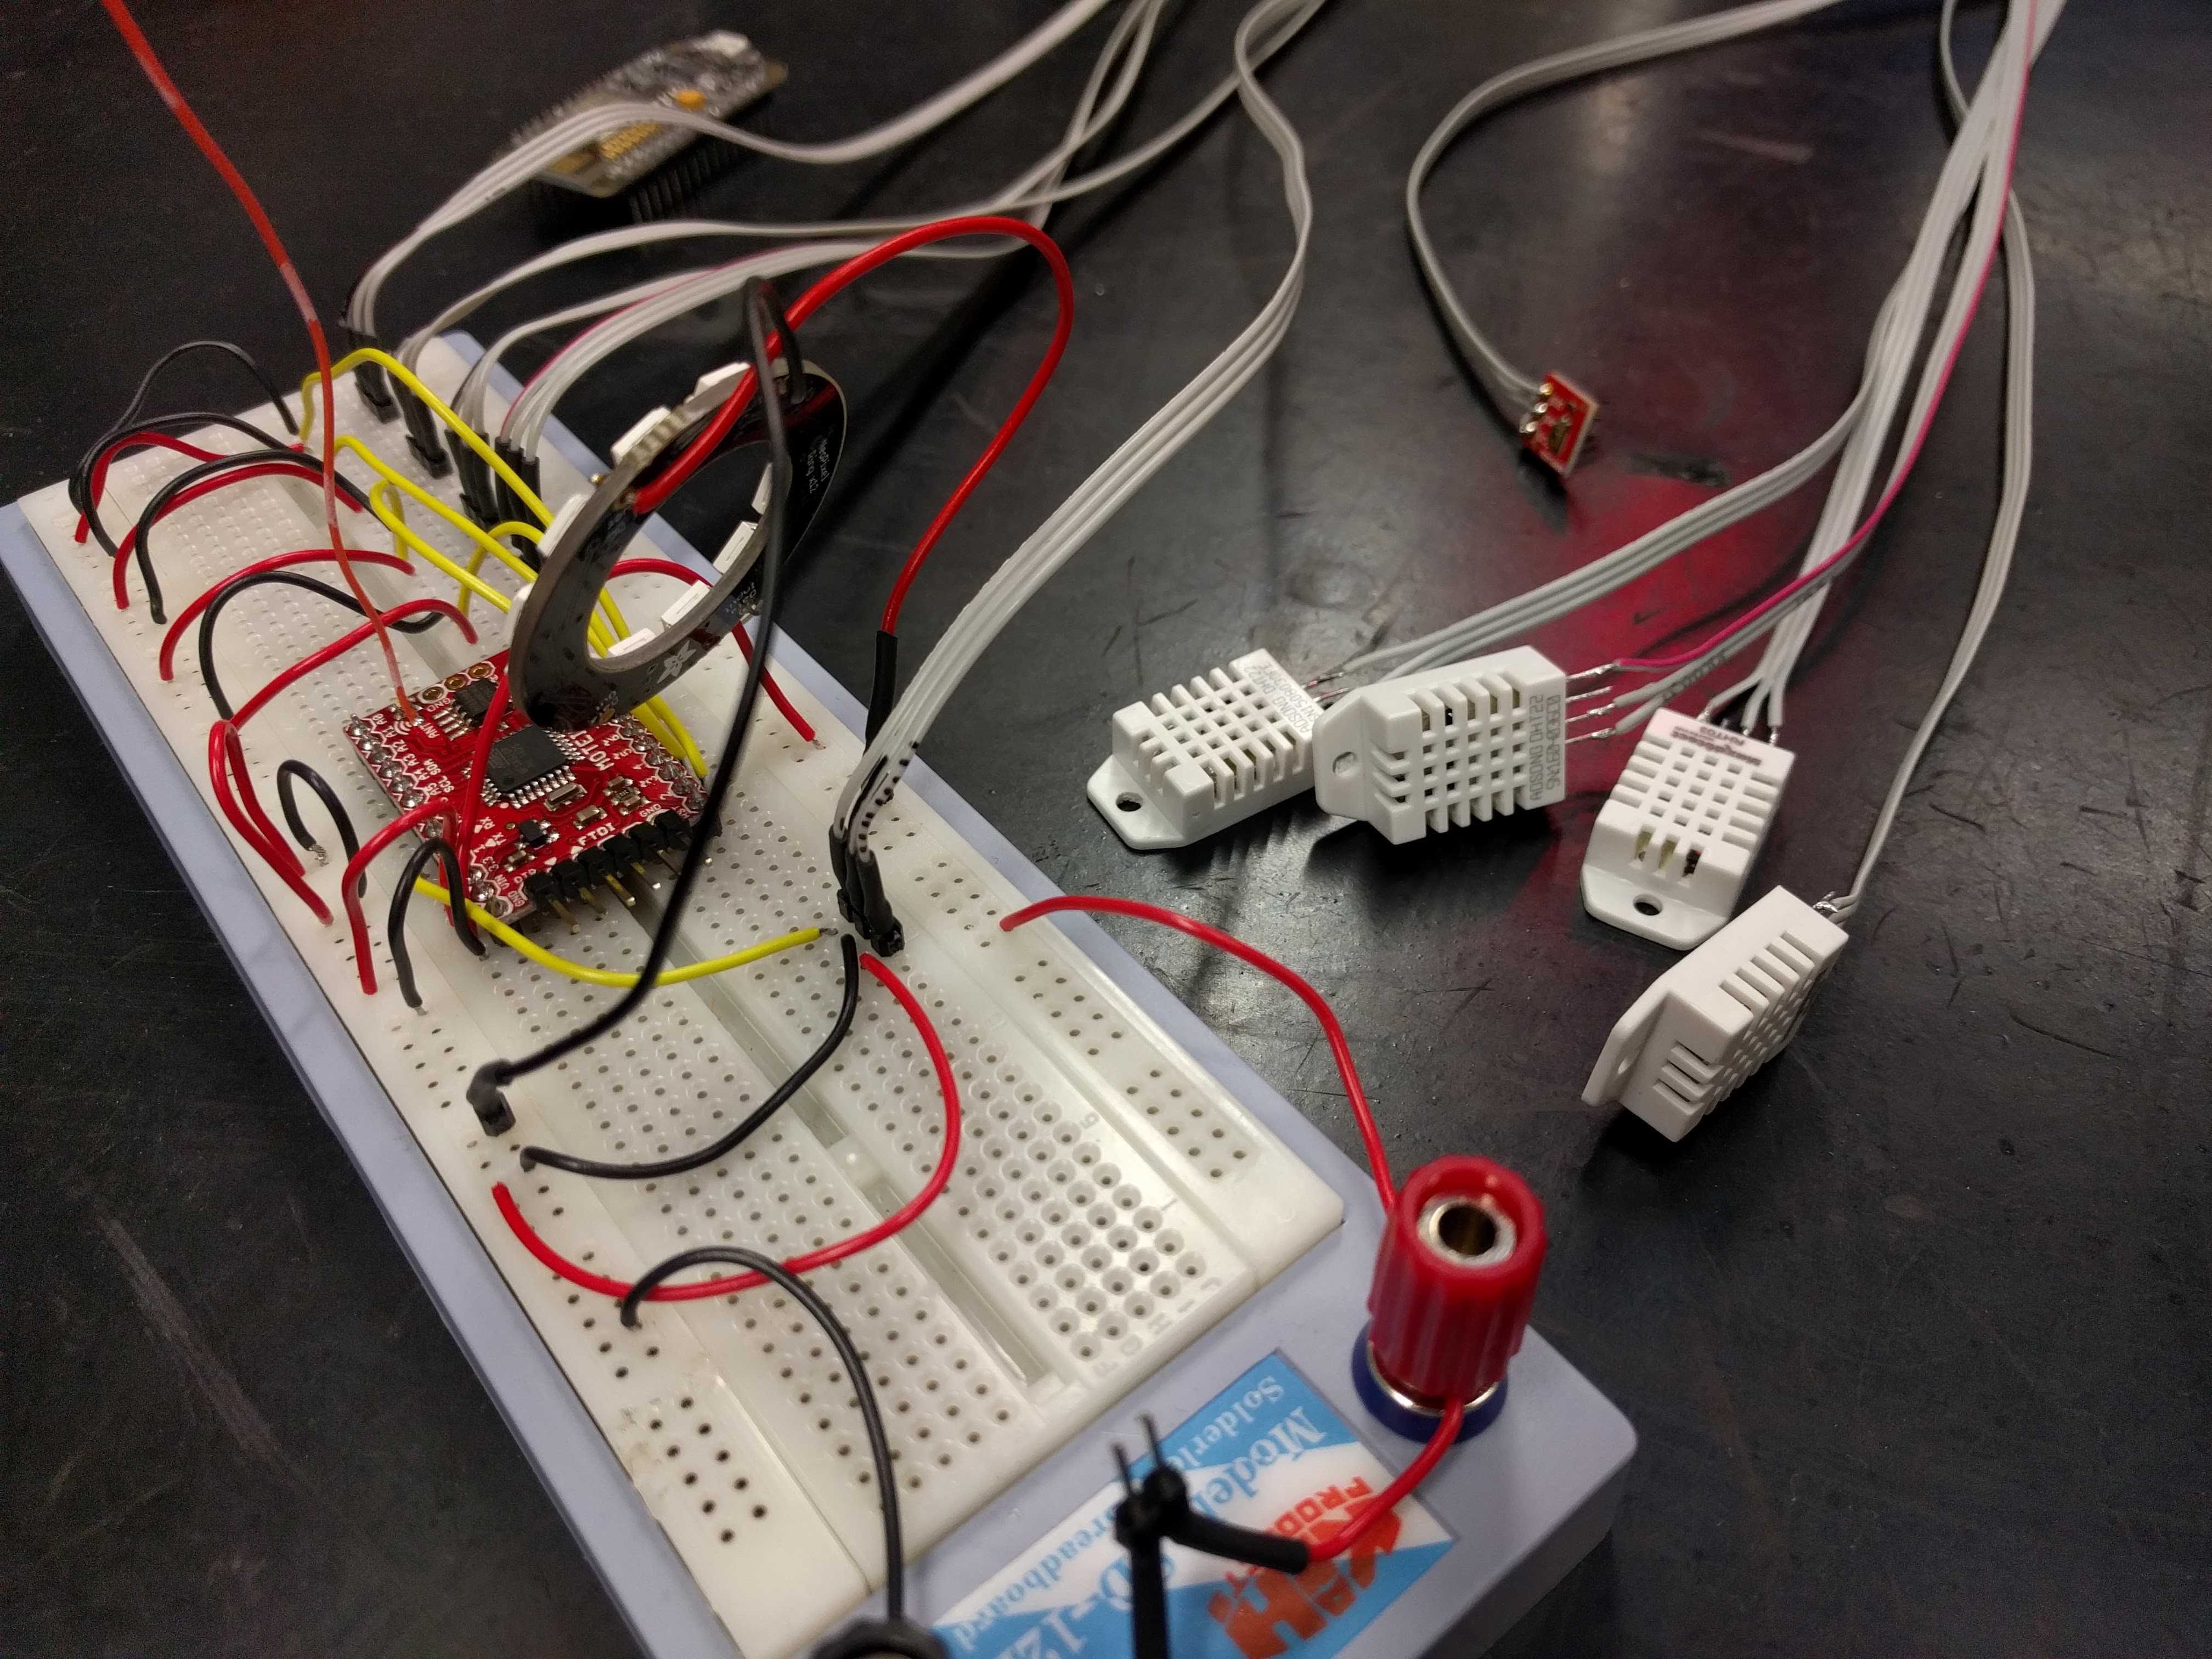
We began assembling a quick proof of concept. Handily, Tom had a bunch of DHT22 temperature and humidity sensors lying around which provided a good start. Regarding a microcontroller, I’ve wanted an excuse to play with radio communication for some time, and this was a nice opportunity to try out a pair of Moteino R4s. We also discussed a future idea to use Bluetooth because the idea of pairing my phone with a beehive during an inspection seemed both amusing, and a useful way to download data that is less practical to transmit over radio to a device.
We set to work. Tom retrofitted some code he had previously written to manage wireless comms between Moteinos, while I cut and badly stripped some wires. After some breadboard battling, we had a working prototype in quarter of an hour. Not content with this, we attached the sensors to lengths of flat cable, added a TEMT6000 ambient light sensor and a NeoPixel ring for no particular reason other than the fact we love NeoPixels so much.
Base Station Prototype Receiver
We verified that the packets containing the sensor data were being broadcast. The Moteino queries the sensors and loads the results into a struct which is then transmitted over radio as binary by the RMF69 library. Now we needed a base station to pick up the transmissions and do something interesting.
We already had packet handling and receiving code for the second Moteino, but as we’d decided (for the time being at least) that the endpoint for the sensor data was to be hosted on the internet, we needed WiFi. Enter our WiFi enabled friend: the ESP8266.
We needed to establish a software serial link between the Moteino and ESP8266, a trivial use-case that can be solved by the Arduino SoftwareSerial library. I did encounter some familiar confusion arising from our trusty pinout diagram, connecting the marked RX and TX pins on the NodeMCU to the Moteino interfered with my ability to actually program it. We instead set the RX/TX pins to the unused D1 and D2 respectively.
The receiving Moteino captures each transmitted packet, reads the first byte to determine its type (we’ve defined only one, but it’s good to future proof early) and if it is the right size, passes the binary data through its serial interface to the ESP8266 before returning an acknowledgement to the transmitting Moteino.
The NodeMCU uses the ESP8266WiFi library to establish a connection to the SSID defined in our configuration file. The ESP8266 Arduino repository serves as both a helpful lookup of the source, and typically features examples of each library.
Once connection to the designated SSID has been negotiated, the controller listens to the software serial receive pin for data. When available, the first byte is read (as before on the Moteinos) to determine the packet type. If the packet type is valid, we listen for as many bytes as necessary to fill the struct for that particular packet type. We ran in to a lot of head scratching here, eventually discovering that our packet structs were larger than calculated, as uint8_t‘s are packed with 3 leading bytes to align them to the architecture of the NodeMCU. This caused us almost an hour of debugging many off-by-some-bytes oddities in our packet handling.
Once a valid packet’s binary stream has been loaded into the appropriate struct, we translate it to a JSON string via the rather helpful ArduinoJSON library. As the ESP8266HTTPClient requires a char* payload, I wasn’t sure of the correct way to actually transmit the JSONObject, so I rather unpleasantly abused its printTo function to write it into a fixed size char array:
|
1 2 3 4 5 6 7 8 9 10 11 12 13 14 15 |
[...] StaticJsonBuffer<256> jsonBuffer; JsonObject& json = jsonBuffer.createObject(); jsonifyPayload(json, payload, pkt_type); http.begin(endpoint, fingerprint); http.addHeader("Content-Type", "application/json"); char msg[256]; json.printTo(msg); Serial.print(msg); int httpCode = http.POST(msg); [...] |
Note the fingerprint in the http.begin: a required parameter containing the SHA1 fingerprint of the endpoint address if you are attempting to use HTTPS. Without this, the library will just refuse to make the connection. It would have been trivial to diagnose this earlier if we could actually work out how to properly enable debug messages from the ESP8266HTTPClient library. Despite our best attempts, we had to force the debug mechanism to work by manually editing away the guards around the #define DEBUG_HTTPCLIENT header, in the installed packages directory. No idea why. Grim.
Other time wasted involved a lot of tail chasing given after what appeared to be the delivery of a successful POST request, a httpCode of -5. It would later turn out that the Python SimpleHTTPServer example I lazily downloaded from the web failed to set the headers of the response to the POST request, causing the ESP8266HTTPClient to believe the connection to the server was lost (an all-else-fails assumption it makes if it is unable to parse a response from the server). The -5 refers to a definition in the library header: #define HTTPC_ERROR_CONNECTION_LOST (-5).
Finally, we received HTTP_CODE_OK responses back from our test server, which happily dumped our JSON response to the terminal on my laptop…. After I remembered to join the WiFi network we’d connected the NodeMCU to, at least.
The Web Interface: Back from the Dead
We have established end-to-end communications and confirmed that sensor data can find its way to a test server hosted on the local network. The final piece of the puzzle was to throw up a website designed to receive, store and present the data. Somewhat fortuitously, a project that I had begun and abandoned in 2014 seemed to fit the bill: Poisson, a flask-fronted, redis-backed, schema-less monitoring system. Despite not looking at it in almost three years, I felt there might be some mileage in revising it for our purpose.
Initially Poisson was designed to monitor the occurrence of arbitrary events, referred to by a key. A GET request with a key, would cause Poisson to add a timestamped entry to the redis database for that key. For example, one could count occurrences of passengers, customers, sales or other time sensitive events by emitting GET requests with a shared key to the Poisson server. The goal was to generate interesting Poisson distribution statistics from the timestamped data, but I never get as far as the fun mathematics. The front end made use of the hip-at-the-time socket.io framework, capable of pushing newly detected events in real time to connected clients, and drawing some pretty pretty graphs using d3 and cubism.
After some quick tweaks that allowed requests to also specify a value for the latest event (instead of assuming 1) and provided an API endpoint for POST requests that wrapped the mechanism of the original GET for each key:value pair in the JSON data, we were ready to go.
Until I discovered all this newfangled websocket nonsense didn’t seem to play well with apache in practice. After much frustration, the best solution appeared to involve installing gevent with pip on the server, which according to the flask-socketio documentation for deployment would cause flask-socketio to replace the development server (typically inappropriate for production use) with an embedded server capable of working in prod. I could then invoke the application myself to bind it to some local port. After some fiddling, I found the following two lines in my apache config were all that was needed to correctly proxy the locally-run Poisson application to my existing webserver.
|
1 2 |
ProxyPass http://localhost:5000/ ProxyPassReverse http://localhost:5000/ |
Testing the Prototypes (not in a hive)
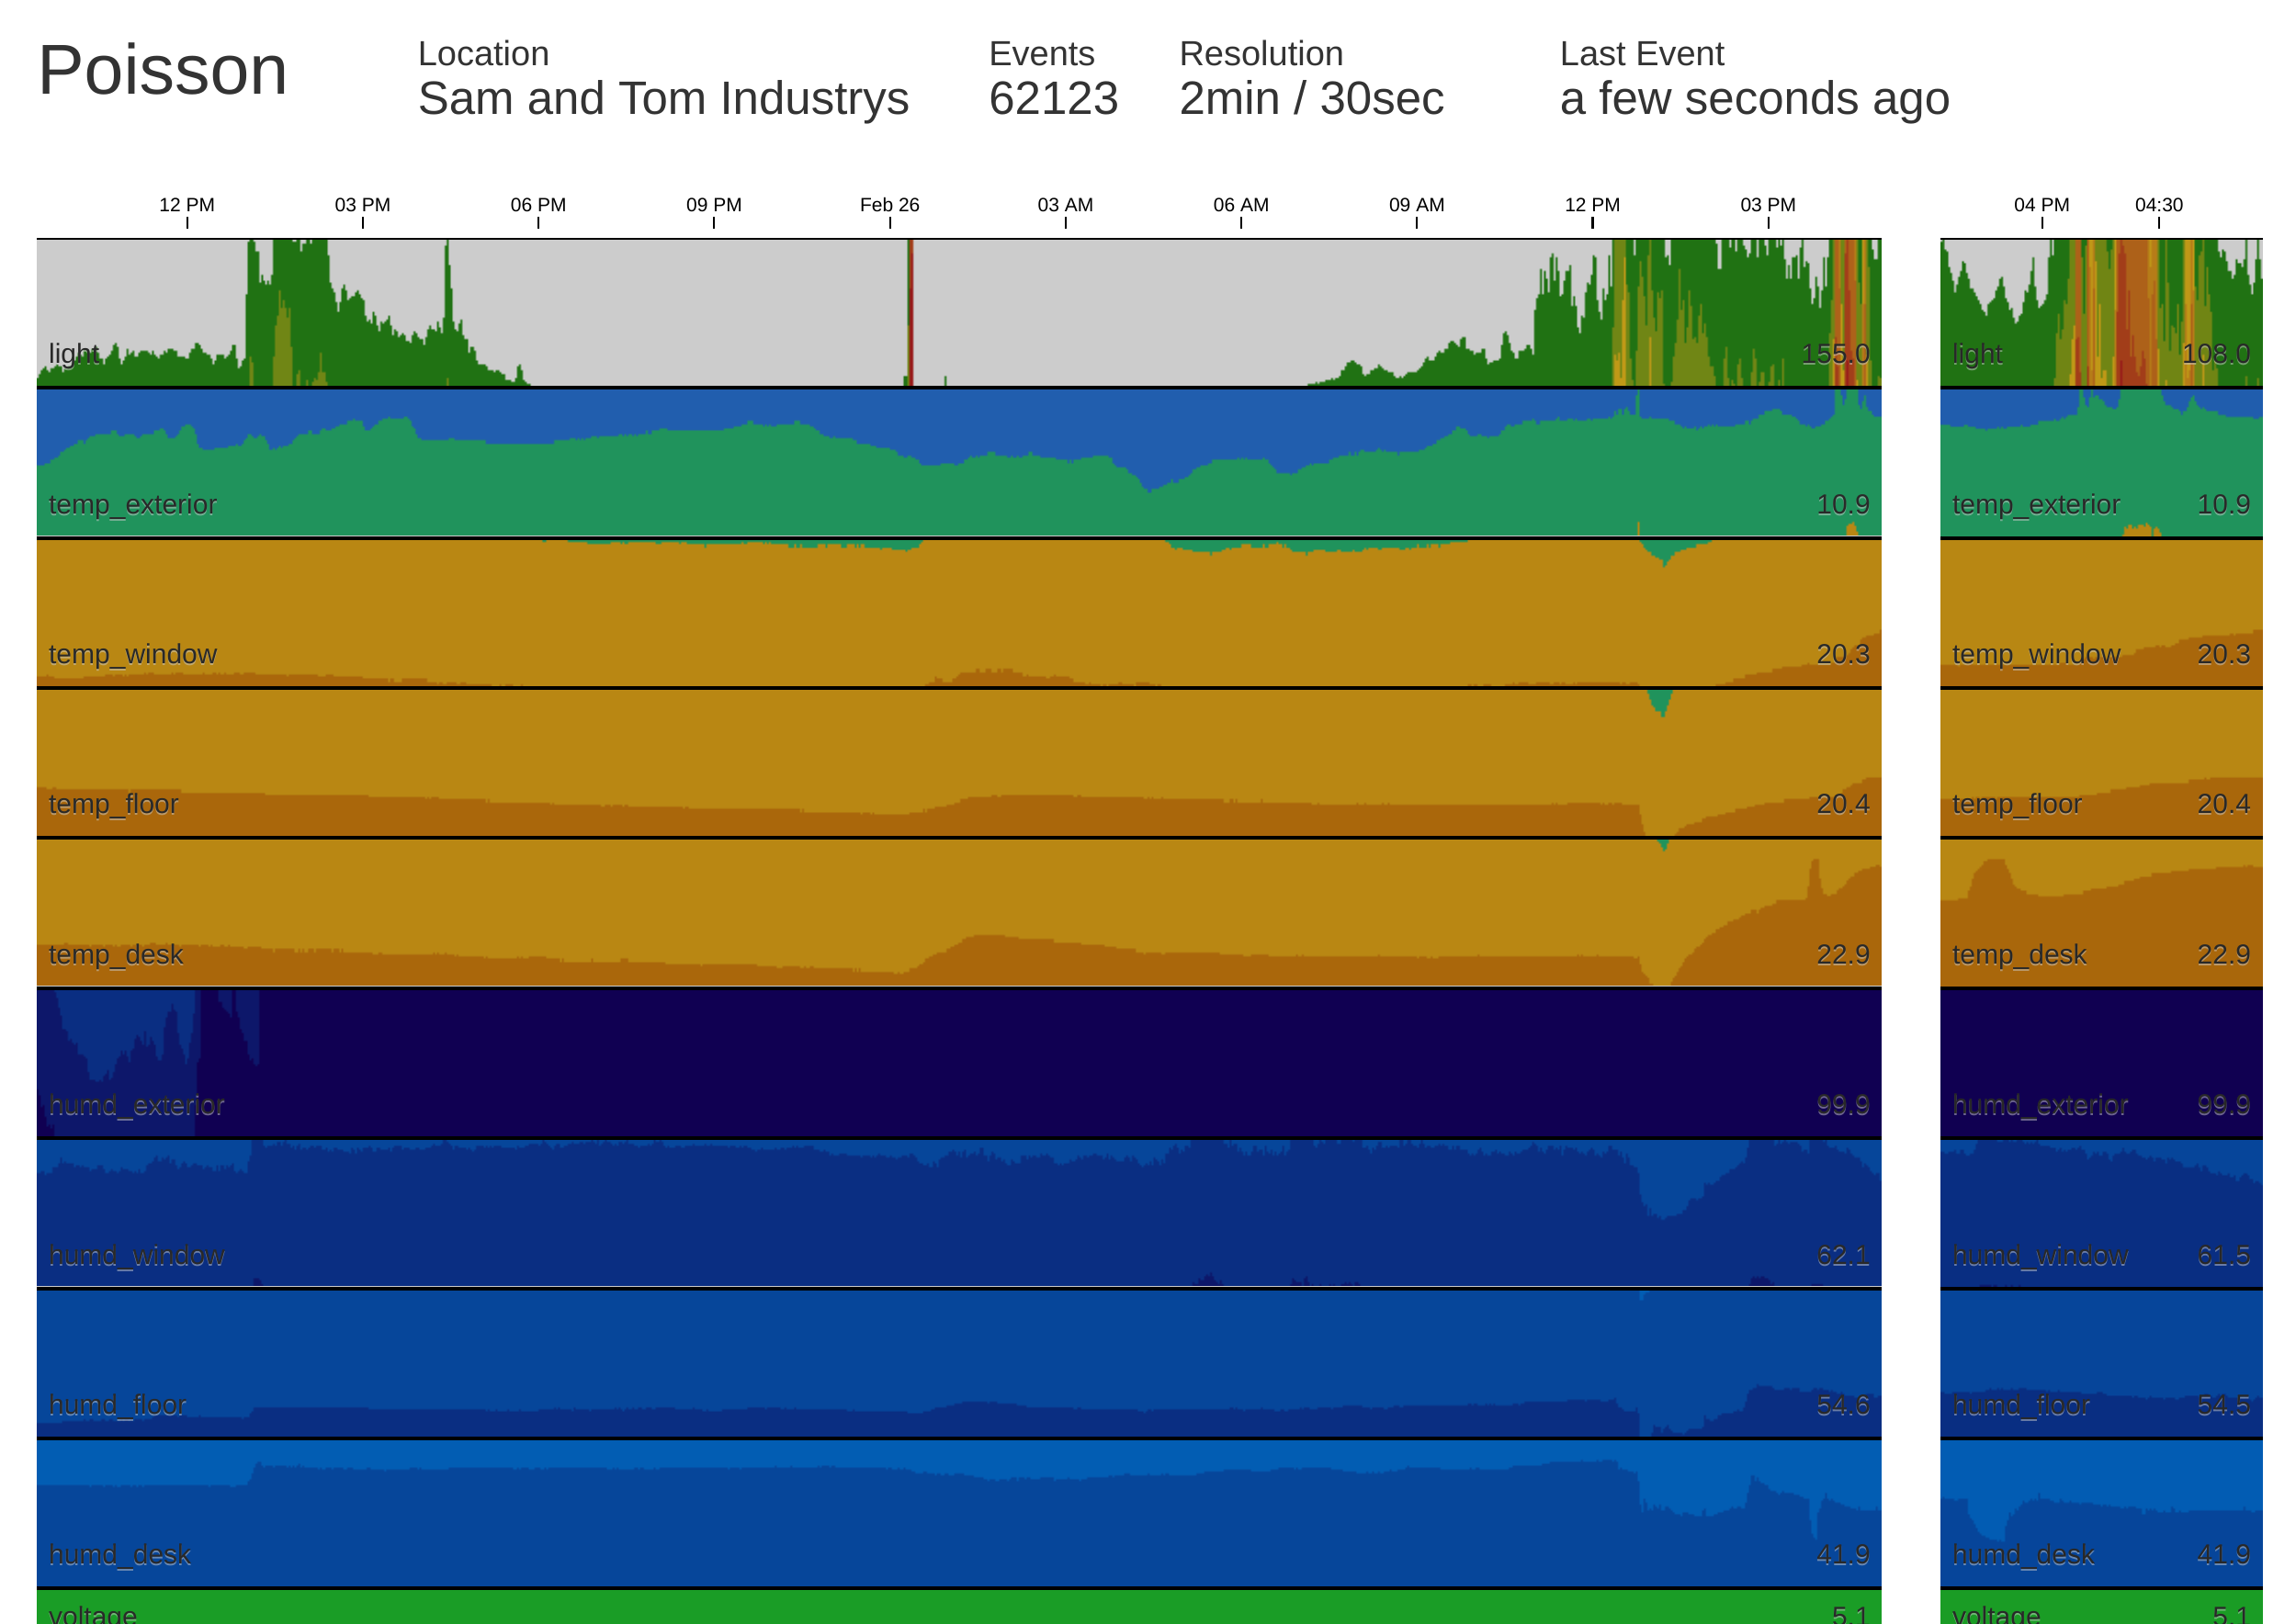
Clearly we’re not hive ready. We’ve planted the current version of the hardware at Tom’s house (to avoid having to deal with getting the ESP8266 to work with eduroam‘s 802.1x authentication) and had the server running long enough to collect over 100,000 events and iron out any small issues. We’re currently polling approximately every 30 seconds, and the corresponding deployment of the Poisson interface is configured to show over 24 hours of data at a resolution of 2 minutes, and the past 90 minutes at a resolution of 30 seconds.
All in all I’m pretty pleased with what we’ve managed to accomplish in around two days of half baked work, and the interface is probably the shiniest piece of web I’ve had the displeasure of making since Triage.
Conclusion
We’ve collected over 100,000 events with little issue. I’ve ordered some additional sensors of interest, on the way are some sound sensors, and infrared sensors. The latter I shall be using in an attempt to count (or at least monitor) bee in/out activity at the hive entrance.
It won’t be until nearer the middle-to-end of March that the weather will likely pick up enough to mess around with the hive at length. Though we must bee proof the sensors and construct a weather proof box for the transmitting Moteino before then. You can also look at the microcontroller code in our Telehive repository, and the Poisson flask application repository.
In the meantime, go spy on Tom’s flat live.
tl;dr
- Moteinos are awesome, low power radio communications are cool
- The Arduino IDE can be a monumental pain in the ass sometimes
- We had to manually uncomment lines in the headers for the
ESP8266HTTPClientlibrary to enable debugging, we still cannot fathom why - You need to specify the SHA1 fingerprint of your remote server as a second parameter to
http.beginif you want to use HTTPS withESP8266HTTPClient - Your crap Python test server should set the headers for its response, else your
ESP8266HTTPClientconnection will think it has failed ESP8266HTTPClientuses its own response codes that are#define‘d in its headers, not regular HTTP codesuint8_t‘s are packed with 3 bytes to align them on the NodeMCU ESP8266 architecture- This kind of stuff continues to be fraught with frustration, but is rather rewarding when it all comes together